Outdoor dummy camera installation involves selecting a blend-in shell (plastic or metal), mounting it securely, and connecting to your security system. Key steps include choosing materials for photorealistic camouflage, drilling pilot holes, testing power supplies, and regular cleaning. Proper weatherproofing and secure mounting ensure longevity in diverse environments.
“Uncover the secrets behind creating an unassuming yet robust security setup with realistic outdoor camera shell design. This comprehensive guide delves into the intricacies of designing and installing dummy cameras, ensuring both effectiveness and discretion. From understanding the importance of durable materials to mastering camouflage techniques, we provide a step-by-step installation process. Learn best practices for maintenance to keep your fake camera setup functioning seamlessly, offering peace of mind without sacrificing aesthetic appeal.”
- Understanding Outdoor Security Camera Shells
- Choosing the Right Material for Durability
- Design Considerations for Camouflage Effectiveness
- Installation Process: Step-by-Step Guide
- Best Practices for Maintaining Your Dummy Camera Setup
Understanding Outdoor Security Camera Shells
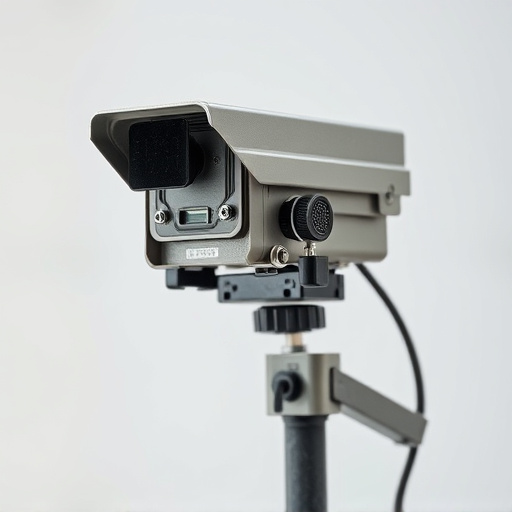
Outdoor security camera shells are designed to protect and conceal your surveillance equipment, making them an essential component in outdoor security camera installations. These shells, often referred to as dummy cameras or decoys, serve a dual purpose: they deter potential thieves or vandals by appearing as real cameras, and they provide a layer of security by masking the actual camera’s location.
The process of installing an outdoor dummy camera involves several steps. First, you need to choose a shell that matches your environment and camera requirements. These shells come in various shapes and sizes, from realistic looking fake cameras to simple, sleek designs. Once selected, you’ll need to mount the shell securely at the desired location, ensuring it’s sturdy enough to withstand outdoor conditions. This typically involves using screws or brackets to attach it to a wall, pole, or other suitable surface. The final step is connecting the dummy camera to your security system, allowing it to send alerts and record footage when triggered.
Choosing the Right Material for Durability
When designing a security camera shell for outdoor dummy camera installation, selecting the appropriate material is paramount to ensure durability and longevity. The chosen material should be able to withstand harsh weather conditions, including extreme temperatures, rain, snow, and UV radiation from sunlight. Plastic and metal are popular choices due to their resilience and ease of molding or fabricating into complex shapes. High-quality plastic polymers like PVC (polyvinyl chloride) offer excellent impact resistance and flexibility, making them ideal for protective casing. On the other hand, aluminum alloys provide superior strength-to-weight ratio, corrosion resistance, and can be easily formed into sleek designs.
Consider factors such as environmental exposure, budget, and aesthetic preferences when making this decision. For instance, if the camera will be placed in a particularly harsh environment, like near bodies of water or in industrial settings, metal shells may offer better protection against impact and corrosion. Conversely, for more subtle installations where aesthetics matter, plastic casings can mimic real cameras while providing adequate shelter from the elements.
Design Considerations for Camouflage Effectiveness
When designing a realistic security camera shell for outdoor dummy camera installation, the primary goal is to achieve a convincing camouflage effect that seamlessly blends with its environment. This involves careful consideration of material choices and visual aesthetics. Opting for weather-resistant synthetic materials that mimic real camera textures can help create an authentic appearance. The design should incorporate subtle details like imperfections, shadows, and texture variations found on actual cameras to enhance realism.
Additionally, the shell’s shape and dimensions must align with standard camera models to ensure a convincing replica. Incorporating functional components such as a lens opening and connector ports can further boost authenticity. By following these outdoor dummy camera installation steps, users can deploy realistic security camera shells effectively, leveraging their camouflage capabilities to deter potential intruders while maintaining an unassuming presence in various outdoor settings.
Installation Process: Step-by-Step Guide
The installation process for an outdoor dummy security camera involves a series of straightforward steps, making it accessible for both DIY enthusiasts and professionals alike. Firstly, select a suitable location for your camera, ensuring it’s positioned where it can capture clear footage without obstructions. This could be on a wall, fence, or pole. Next, gather the necessary tools: a drill with appropriate bits, screws, and your dummy camera. Create pilot holes to prevent cracking the surface and securely attach the mounting bracket using the provided hardware. Once the bracket is firm, carefully place the camera in its housing, ensuring it aligns with your desired field of view. Finally, connect the power cable to the camera and hide it neatly for a discreet finish.
For an efficient Outdoor Dummy Camera Installation, follow these steps diligently. Ensure all components are compatible and tailored to your chosen location. Regular maintenance checks will guarantee optimal performance and longevity of your security system.
Best Practices for Maintaining Your Dummy Camera Setup
To ensure your outdoor dummy camera setup remains effective, regular maintenance is key. Start by cleaning the camera thoroughly using a soft cloth and mild detergent to remove dust and debris that can obstruct the lens. This simple step significantly improves image quality. Next, periodically test the power supply to prevent any unexpected disruptions. Secure connections and ensure no signs of damage or corrosion on cables.
For an outdoor dummy camera installation, weatherproofing is essential. Check for any gaps or damage to the housing and seal them with appropriate caulk. Additionally, consider using a waterproof power connector and ensuring the entire setup is mounted securely to withstand varying weather conditions. Regular maintenance not only keeps your camera operational but also extends its lifespan.
A realistic security camera shell design combines durability, camouflage effectiveness, and thoughtful installation to create an indispensable outdoor surveillance solution. By selecting the right materials and meticulously considering the design, you can successfully integrate a dummy camera setup into your environment without compromising on security or aesthetics. Following the outlined installation steps ensures a seamless process, while adhering to best practices guarantees its longevity. Remember, the key to successful outdoor dummy camera deployment lies in the careful fusion of functionality, camouflage, and maintenance – allowing you to achieve maximum security with minimal visual impact.